transform a photo box into a bedroom for dolls

Updated: Jul 12

I made and sold at least 40 or 50 of these doll bed-in-a-box sets, each one unique, a few years ago. After making the first one, I kinda got obsessed because mixing the fabrics and textures was downright fun! I've since had a lot of requests for details on how to make them, so thought I'd share the how-to here in My Doll Mall LookBook.
SUPPLIES
Most of the supplies can be purchased at local fabric and craft stores.
Decorative photo storage box
2 small 1/4” hex nuts
3/16” wood dowel (to fit in the hole in the hex nuts and to accommodate hangers)
mirror or scrapbook photo frames or other bits of art
Super glue
Ruler
1" thick foam
Fabrics
Batting
Thread
You can start with the box or the bedding, doesn't matter. For this demonstration, we'll start with the box.
CLOSET HOW-TO

1. Mark a dot inside the box 2” from the top and 2” from the back on both sides. (These marks are where you will glue the hex nuts.) The top of the box is the end where the metal thing is on most photo boxes.
2. Super glue a hex nut on each of the two insides at the marks. (The hex nuts are the holders for the dowel.)
3. Cut the dowel to the width of the box (I find that most are around 7-3/16" wide, but not all).
4. Insert the dowel into and between the two hex nuts as the clothes rod after the glue has hardened.
The closet side of the box is done!

5. Put clothes on the hangers and voila! Instant closet and it all packs up neatly into the box.
Add a label to the end of the box for easy identification when stored. Hangers can be found in most dollar stores or online.
BED & BEDDING HOW-TO
Next, I added luxe bed sets that pack up Murphy-bed style into the box lid when not displayed or played with.

1. Choose fabrics. I like to mix at least three complementary fabrics and textures. This is my favorite part, choosing fabrics.
2. Cut the foam to 10-1/2" tall by 6-3/4" wide. I use 1” craft foam for the bed because the lid is 1” deep.
3. Cut your fabric pieces:
Bottom sheet, cut 1 piece: 13" wide x 17" tall
Comforter, cut 2 pieces (use different fabrics so it can be reversible): 10-1/2" wide x 11-1/2" tall
Comforter batting (to put between comforter layers), cut 1 piece: 10-1/2" wide x 11-1/2" tall
Body/headboard pillow, cut 1 piece: 16" wide x 5" tall
Standard pillows, cut as many as you want (I like lots of pillows and vary the sizes of smaller throw pillows): 11" wide x 3-1/2" tall
4. Stitch the bottom sheet, right sides together down the long side. Center the seam (it will be on the underside of the foam mattress) and press seams open. Stitch one end closed. Turn right side out. Insert foam into bottom sheet. Tuck the open end inside and hand stitch closed. The bottom sheet is stitched on and not removable. You could leave it open at one end to change if you want but the foam wears if handled too much.
5. For the comforter, put the two fabrics right sides together, then add the batting on top of that. Stitch all the way around leaving a few inches open at the bottom for turning.
6. Turn comforter right side out through the opening in the bottom. Press. Use hem tape or hand stitch the opening closed at the bottom.
7. I use an envelope fold for the pillows. Right sides together, fold the pillow case in thirds, overlapping in the back. Press under 1/2" or so at both overlapping ends. Stitch each side and turn right side out. Sometimes I like to add trim, so I do that before overlapping and stitching the sides. Stuff with fluffy batting directly into the envelope case. To launder, just remove the batting and put back in when dry.
8. Super glue the mirror or artwork to the inside of the box lid in the upper half of the lid as it will be above the bed. (Mostly I created mini art pieces as an alternative to the mirror, especially when making them for children.)
Arrange pillows on the bed, using the body pillow as the headboard pillow, add doll clothes and poof! Mini bedroom for dolls!
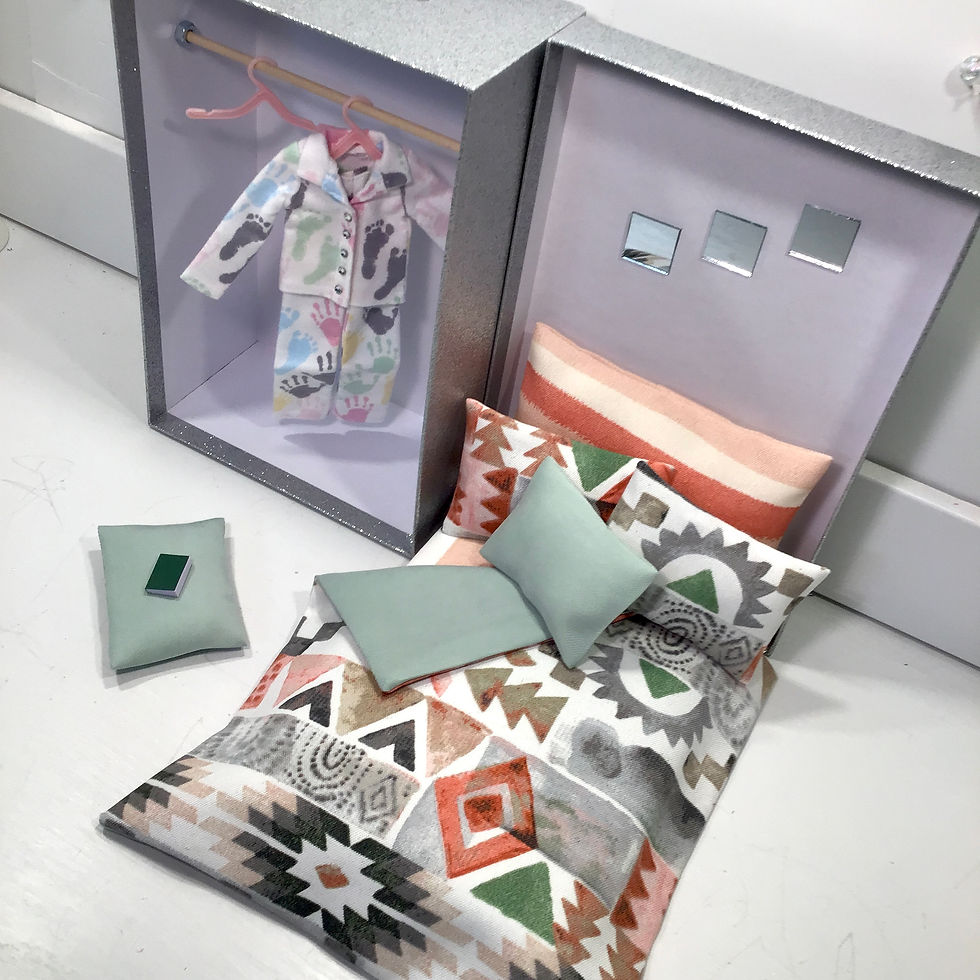
That's it! And it all packs up neatly back into the box. If you make one, please send a picture and let us know how it went!

Photos (c) 2021 K Hartman

Comments